Replacing a bad balljoint.


Well, this is a fairly simple procedure.  It doesn't even require jacking up the vehicle.  The hardest thing is removing the old pressed in ball joint.
 
Your going to need a few tools:
- Breaker bar
- Pitman arm puller or pickle-fork (I use AutoZone rental tools)
- lube gun (for filling up the joint)
- torque wrench (55 ft.lbs)
- assortment of wrenches and sockets.


First off, the ball joint kit.  NAPA Chassis (NCP 269-2790) from NAPA in Oklahoma City for $35. There are two levels of quality at NAPA. MRC and NCP. NCP is the high end. Forged, not cast, and carries a lifetime warranty vs 1year for the other. When it comes to critical parts it is not only the cost of the part but the cost of what happens if that part breaks. And if this part breaks at speed, you or someone else, can die. I don't want to die because you bought some cheap ass part.. mkay. :)

 
This is the old passenger side ball joint.

But before you start, think.

You need to have the measurements off your existing setup or plan on going to an alignment shop.

What ever you do, don't move the wheels and try not to rock the Jeep while you have the ball joint out. I still suggest having an alighment done after any front end work, especially on the tie-rod and lower arms as they affect alignment.

You need a tool like this, it's called a pitman arm remover but it works for just about any ball joint and is much easier on your ears than the conventional "pickle fork".

Let's talk about marking.

You need to measure between the center of the bolt and some place out on the tie bar. This is so when you put it all back in your where you need to be.

You can also make a few other measurements along the way.

I used a square to trasfer the track bar end to the drag link.

Remove the old cotter pin and castle nut then set the remover squarely over the bolt. A little PB Blaster on the bolt will make things easier. Note that the remover is cocked to the right. That is the way it tightens. If you put it the other way it will simply move around and likely fall off. You will have to move the old grease boot out of the way to make it fit, that's normal.

Your now going to tighen that bolt to press out the balljoint stem. There is no need to "HONK" on it, just tighten with a breaker bar. Once it feels like you have it fairly snug (you don't want to break it), then given the bolt a nice tap with the BFH.

That's the ticket.....
Next, I made one more rough measurement. Transferred the old links length to the new link and marked the treads with a bit of tape. This was guesswork but the idea was to get within a few threads then use the other two measurements to finish the job.
The rest amounts to loosening the bolt that clamps the ball joint in and unthreading it. But before you thread the new balljoint in, take the time to fit the new zerk that comes in the package. It's either now or while standing on your head under the Jeep. :)

Now is the time you clean any dirt from the hole and balljoint stem, then put on the grease boot.

Move the tie bar back into place and check the fit. Measure off your reference marks and if everything is aligned then it's time to button this puppy up.

You did check to see the grease seal was on, right? :)

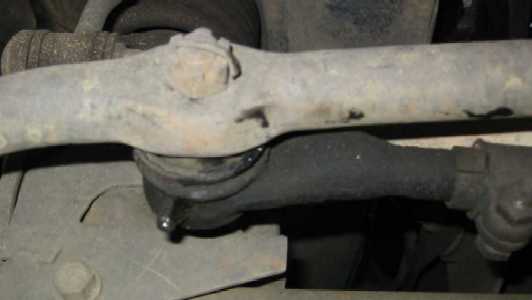
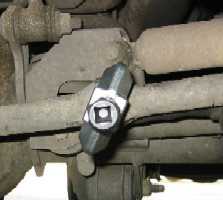
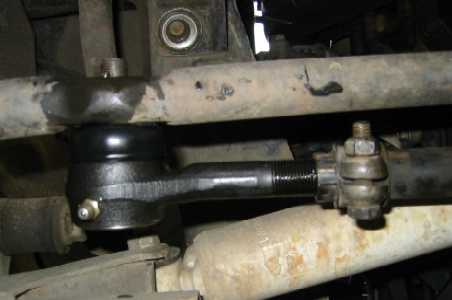
This is what you should see. The zerk is in, the boot is on, (remember the boot), and the clamp is pointing down and not caught up on the drag link. See the little hole, it's where a cotter pin will go. If your part is like mine then you might want to clean out the edges of that hole. I didn't and getting the cotter pin in was a real pain in the butt.

At any rate, now the castle nut goes on (castle side out) to 55 ft.lbs. If the hole doesn't align then tighten the nut further. It's not advisable to loosen the castle nut to get a cotter pin in. Just like in the original shot, the cotter pin goes in from the top and the legs are bent over and back.

Now is a good time to add some more grease to the joint. Squeeze in enough so it comes out the top of the boot and your done.

Don't have a grease gun? Then have a local shop top it off. There is enough assembly lube in there for a short time, but not enough for daily driving.

That's it.  Doesn't take that much time.
 

Difficulty rating:
TGB - Two Good Beers

 
--DougW--
CopyLeft.  You are free to link, distribute or use the information
on this page provided credit is given where credit is due.