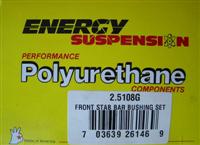
| First off, the busing kit. Energy Suspension (Part# 2.5108G)
from 4 Wheel Parts #13 in Oklahoma City for $24
Yea.. I did the rear with R (red) but after a few months they all look black anyway. :). |
 |
Well, this is a fairly simple procedure. It doesn't even require
jacking up the vehicle. The hardest thing is removing the old press-fit
bushings.
| First off, the busing kit. Energy Suspension (Part# 2.5108G)
from 4 Wheel Parts #13 in Oklahoma City for $24
Yea.. I did the rear with R (red) but after a few months they all look black anyway. :). |
|
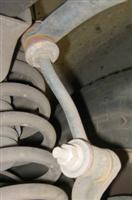 |
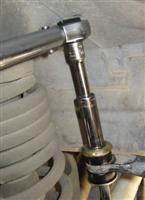
This is a picture of the old passenger side link. There are several
ways to start. I simply disconnected the links and removed the whole
bar. You could go after the top nut by going in over the wheels,
the same way you finish torquing it up.
You might need a short extension and a deep-well socket to clear the threaded ends. And a T55 torx to hold that lower bolt while you take the nut off. I used a crescent wrench, but a deep well socket would also work Leave the upper mount connected and the lower bolt in for now. It makes the next step a bit easier. |
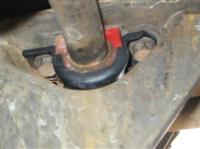
| Take the plastic shroud off and loosen up the bolts that hold the upper
bushings. The bolts you left in will help keep the bar from falling
into your face.
Now you can remove the clamps and let the bar swing down, remove the lower link bolts and remove the whole assembly. |
 |
| No picture, but if you look above you can see where the rust and debris have built up. Make sure you clean off all the rust and get the metal under those bushings back to a nice shiny state. Any rough surface you leave will simply chew away your new bushings. Why waste all that time just to destroy another set, clean off the crud-bunnies and apply lube to all surfaces of the new bushing. The split goes toward the firewall. Press on the U clamps and now it's time to work on those links. |
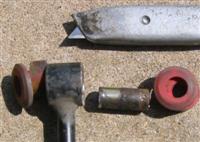 |
Remove the press fit bushing from that link. Hint: Cut off the shoulders, pound it to one side, grab it with a big pair of vicegrips and twist. |
| Next, clean out the link, and apply assembly lube to the rubber bushing
(inside and out). Any metal-to-bushing surface gets lubed.
That lube also makes it real easy to press everything in.
(a vice helps, but you can also just lean on it with your hand) |
 |
| Now your ready to start putting things back in. Start by putting
the links back on the sway bar. Keep the bushings centered in the
eye and don't forget the new end caps. Pretighten this till you can
just move the link around, your going to need some play and things get
tightened later. (Upper bushings get NO lube)
Raise and support the bar, start the bolts into the frame but only tighten to about 1/4 inch from the frame. Make sure you haven't pinched the bushing material and everything is lined up properly. Move the bar around till you can get the lower links fitted and start the bolts there as well. (Don't forget you need some lube between the metal and rubber. Now your ready to tighten up the lower links. These get torqued to 70 ft.lbs. |
 |
Next is the upper link, these get torqued to 27 ft.lbs. It's
easy to get at by going over the wheel.
After your done with this it's time to get back under and jostle the Jeep. The bar will center itself and now you can finally torque the U clamps down to 40 ft.lbs. Only thing left is to reinstall the lower shroud. If yours has pulled through like mine did, use one of the old washers to hold the shroud up. |
That's it. Doesn't take that much time.
| Difficulty rating:
OGB - One Good Beer |
| --DougW--
CopyLeft. You are free to link, distribute or use the information on this page provided credit is given where credit is due. |