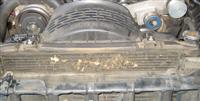
 The front
>_<
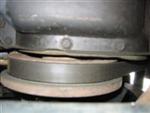
Fist thing was to find out if this was out of true. The easy way is to have the engine running (in PARK with the Emergency Brake ON and wheels blocked) Get under the front and slowly bring a pencil up to the back of the ballancer. If it grinds evenly then your fine, if it hits a high spot on every turn then the rubber has started to slip. Fix it before it gets worse and eats the timing chain cover.
The front
Your going to have to take out a lot of bolts and nuts to get the font
end out. (unless you have a stubby puller)
I didn't. :/
Remember to mark the radiator cross brace. I used tape.
| Remove the fan bolts, it helps to use a screwdriver against the alternate bolt as such. |  |
 |
The fan is held on by studs and bolts. It's possible the stud will come out. But that should be ok, just some threadlock and reinsert later. Once the fan is off, remove it and the shroud as one. You will have to move the whole thing to the left so the shroud can clear the transmission cooler lines. |
NOTE! DO NOT STORE THE FAN FLAT. Store it standing up or you risk the silicone fluid in the clutch leaking and contaminating the internal bearings. (at least that's what the service book says) If you look at the face of the thermostat it says you can store it face down. I stored it face down.
Now for the center bolt on that balancer. Two ways. Either
the engine will provide enough resistance to get it started or your going
to have to hold the ballancer back with a bar. insert a couple of
bolts into the holes in the balancer then put the bar between them.
| This bolt might come out part way then stick. If it does, don't continue to force it. Thread it back in a bit and apply some PB Blaster (penetrating oil) then thread it in/out/in/out a bit more/in.... etc.. it will slowly work free. After you get it out, clean it off. | 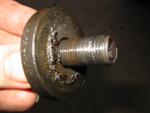 |
 |
While your in there, clean the bugs out of the radiator. :) |
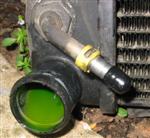
And speaking of taking the radiator out, don't miss the two bolts that hold the AC condenser to the radiator. Those sandwich a rubber gasket so you will have to carefully pry the tabs off. But first, drain the radiator. Radiator drain is down in the lower left corner. Use a rubber tube and drain it into a bucket, you can reuse this or opt for a partial flush. Even if you choose to reuse there will be several quarts of fluid sneak out from the lower hoses and from the radiator as you pull it. Remember to clean up spilled fluid, it's toxic to animials.
You will also have to disconnect the cooler lines from the transmission
(automatic only). It helps to have a couple of rubber caps to plug
these
lines and a couple of baggies to protect the hoses from getting dirt in
them. The little connectors come off by lifting the spring.
(or you can get a special tool). I just lifted the spring with a
fingernail. You can see the little yellow clip, don't loose these.
You have to put that back in the hose end and line it up with the clip.
The actual tool that removes these twists that yellow thing and expands
the metal spring, a fingernail works just as easily.
 |
 |
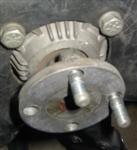
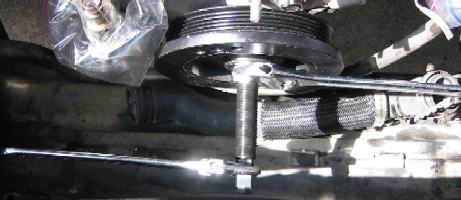
Now to pull off that damper your going to need one of these. Buy
one or borrow one. Note how far the nose sticks out in the center
and how far the balancer is off of the timing cover case. This will
give you a goal when you start the installation.
 |
Use the central threaded holes but DO NOT BOTTOM OUT THE BOLTS. These bolts ride up against the timing chain cover and if you get too deep , you will deform it. Make sure the bolts are all level. Then start turning. You will need to brace the damper, I was able to hold it with one hand and wrench with the other. But you could use a screwdriver between the bolts. |
| After you get that off it's time to clean the nose. (the engines, not yours) Get all the crud out of there or the installation step will be a miserable pain in the butt. Now, before you go any furter.. Note where that key is, on the bottom. That is going to be a pain in the butt. Slip the balancer back on and rotate the key to the top. | 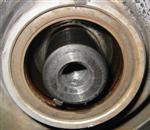 |
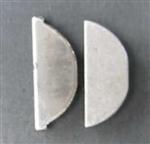 |
Time to knock out that key. Watch the new one you get vs
the old. I reused the old key (nothing wrong with it) because it
fit better than the new key. That close to the center will not make
any balance difference. Put the new key in by using a brass or hardwood
drift and tapping it into place. It will be a snug fit. Get it back
in flat and level. You have to take the old one out to inspect it.
any cracks and you might have more serious problems.
The one on the left is original |
Now you need the installation tool. DO NOT USE A HAMMER!
You want to screw up the thrust bearings, go on and beat on the damper,
you will not get it seated. Also, DO NOT USE THE RETAINING BOLT to
draw the damer on. It's far too weak and too short.
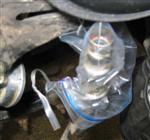
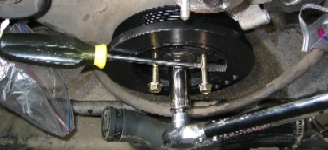
| Use this tool. | 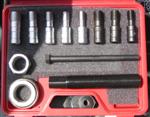 |
| Pick the correct fitment for your crankshaft. 1/2 worked for
me. Thread it till the large end seats. If you can't thread
it in because of crud, clean the crud out and chase it with the retaining
bolt.
See this.. it's not in all the way and might damage your threads. Seat that shoulder. |
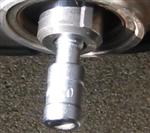 |
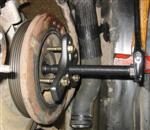
Now you slip the outer threaded rod over and secure it with the long bolt. That long bolt only goes finger tight after it bottoms out, don't put a wrench on it. Slide on the thrust washer, flat side toward the engine, then thread on the nut.
Use a couple of wrenches. Hold the rod from turning while you tighen the nut against the thrust washer. It will slowly draw in. Don't be suprised if you have to lean on it. (I want a longer wrench)
Hey, check out this piece of high tech China stuff.
 Yes, that says
SQUIRREL BRAND. :D
Yes, that says
SQUIRREL BRAND. :D
Now that you have the HB seated it is time to put the retaining bolt back in. 80 FT.LBS you will need to brace the balancer using two of the screws from the puller and a handy screwdriver.
Now it's time to put all that stuff back! YAY!
Watch the rubber shields that go on either side of the radiator. I found it easier to install them on the radiator first then hold them with some tape. The rest is just feeling around and getting everything to fit.
Don't forget the pulley from the water pump goes on before you fit the
fan/shroud. :)
---
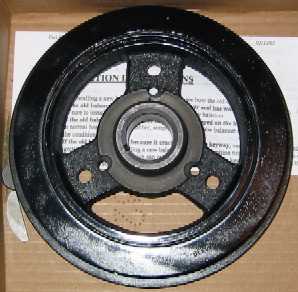
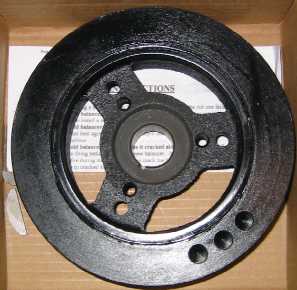
The replacement part.

|
*Six Good Beers Your job will go much smoother using the proper
--DougW--
|
|